Building a dynamic, highly available scheduler in Go
A deep dive into the architecture of the custom scheduler we built for FACEIT Watch


You know how it is – it feels like half the stuff we build as backend engineers ends up running on some kind of timer. Whether it’s crunching data, sending out reports, or just keeping things tidy behind the scenes, scheduled tasks are everywhere. While the tasks themselves can be wildly different, they all share that fundamental need to happen at a specific time or on a recurring basis.
And for us on the Watch team at EFG, it was no different. We run an event-driven system, and that meant we needed a scheduler that could be just as dynamic, something that could even react to what was happening in the stream and adjust its plans on the fly. The truth is, we had very different use cases: from tracking user-liveness (knowing who was watching content and when) to handling the schedule for “drops” (those sweet prizes we needed to distribute at specific times or intervals). On top of that, we also needed to give our admins the power to manually set up and manage these schedules.
In the end, we had to support all sorts of scheduling patterns: your standard cron jobs, simple intervals, lists of specific times, one-off executions way in the future, and even intervals with a bit of random jitter thrown in for good measure. So, we found ourselves at that classic crossroads: do we try to find an existing solution that could bend to our will, or do we just build our own scheduler? We went with the latter, and the rest of this post will tell you exactly why.
Why Go Our Own Way with a Scheduler?
Alright, so you’re thinking about building your own highly available scheduler in Go? Cool! You might be wondering, “Why not just use [insert your favorite existing scheduler here]?”. Fair point. But for us backend folks, rolling our own can be surprisingly appealing:
- Go Feels Like Home: We’re Go developers. We’re just more comfortable coding, debugging, and evolving things in Go using our familiar tools. Third-party black boxes? Less so.
- Vendor Approval? Ugh. Getting new tools or vendors approved can be a major headache with committees, reviews, and procurement. Building in your favorite tech-stack? Less red tape.
- Cost & Feature Mismatch: Off-the-shelf solutions can be pricey and often come with a ton of features you don’t need, while missing the exact ones you do. It’s like paying for the whole buffet when you just want a sandwich.
- Evolving at Our Pace: Need a tweak or add a new feature? With a third-party tool, you’re waiting on their roadmap. With our own Go code, we’re in control.
- Plugs Right Into Our Existing Goodies: Building our scheduler in Go means it just slots right into our company’s existing infrastructure for monitoring, alerting, testing, observability, documentation, service-discoverability, deployment and others. We already have all that set up and battle-tested, so our scheduler gets to benefit from it without any extra fuss. That’s a huge win!
The good news? Building a highly available scheduler doesn’t have to be rocket science. With Go and by leveraging some cool features of MongoDB, it’s totally doable. We’re talking about reliable task execution and graceful failure handling – nothing too crazy. So, stick around, we’re about to dive into how to build your very own robust scheduler in Go!
How We Make This Thing Tick: The Architecture
So, how do we actually make sure our scheduler is both reliable and always available? The core idea is to have multiple instances of our scheduler running at the same time. All instances share the same view of what needs to be scheduled, and they coordinate among themselves to ensure that only one of them is actively triggering jobs. Think of it like having a team where everyone knows the plan, but only one person is calling the shots at any given moment.
Here’s a breakdown of how it all works:
MongoDB Change Streams
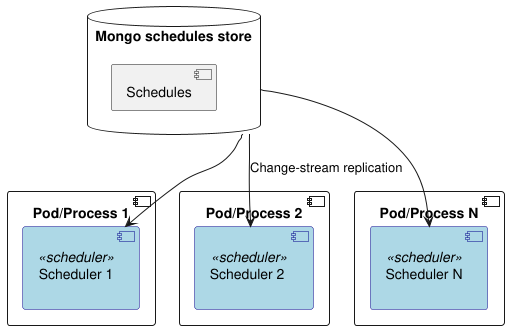
We’ll store all our schedule definitions (cron jobs, intervals, specific times - the whole shebang) in a MongoDB collection.
Each of our scheduler instances will be watching the MongoDB collection for changes using Mongo’s change streams. Whenever a schedule is added, updated, or deleted, Mongo will notify all the scheduler instances. This way, everyone has an up-to-date view of what needs to be run.
Leader Election
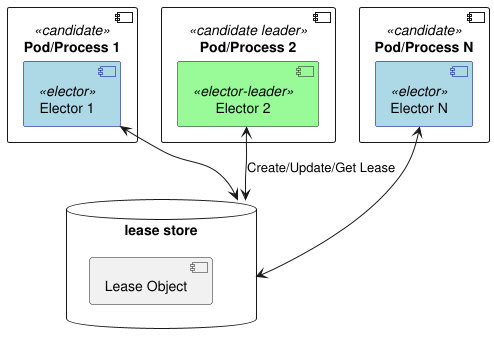
We don’t want all our scheduler instances firing off the same job at the same time, right? That’d be chaos. To prevent this, we’ll use a lease-based leader election mechanism, a simple yet resilient approach for our needs, where each scheduler instance tries to grab a “lease”—think of it like raising your hand to say, “I’ll be the one in charge for now”—with only one instance holding the lease at any given time.
The scheduler instance that successfully obtains the lease becomes the leader. This leader is the only one responsible for actually triggering the scheduled jobs. The other instances will just sit back, relax (but still stay updated via change streams), and wait for their turn to potentially become the leader if the current leader goes down.
If the leader instance fails for some reason, its lease will expire. One of the other scheduler instances will then step up, grab a new lease, and become the new leader. Because everyone is constantly in sync with the schedules in Mongo, the new leader can immediately take over and continue triggering jobs as needed.
Keep the Scheduler Lean, Offload the Work
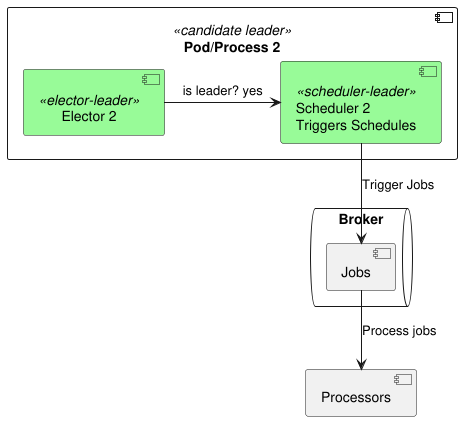
Our scheduler instances should really just focus on the when of things – when a job needs to run. The actual what – the execution of the job itself – should be delegated to separate worker processes (let’s call them “processors”). We can use a message broker (like RabbitMQ or Kafka) to send the jobs to these processors. Why bother? Well, if a job execution throws an error or gets stuck, it won’t bring down our precious scheduler! This way, our scheduler stays healthy and keeps scheduling, no matter what happens with the individual jobs. It’s all about keeping the blast radius small, you know?
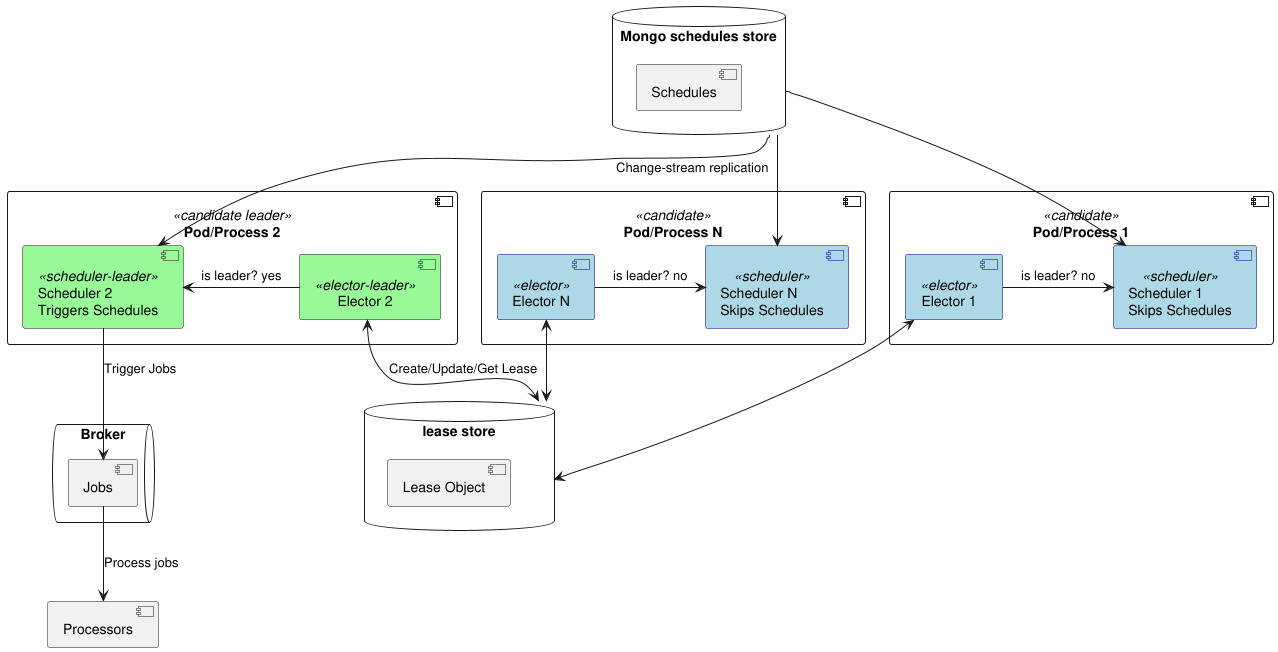
Full Architecture Overview
So, yeah, that’s the gist of it. We’ve got MongoDB for storing schedules, change streams for keeping everyone in sync, and leader election to make sure only one instance is actively sending work to dedicated processors. Below you can see the complete architecture diagram, pretty slick, right?
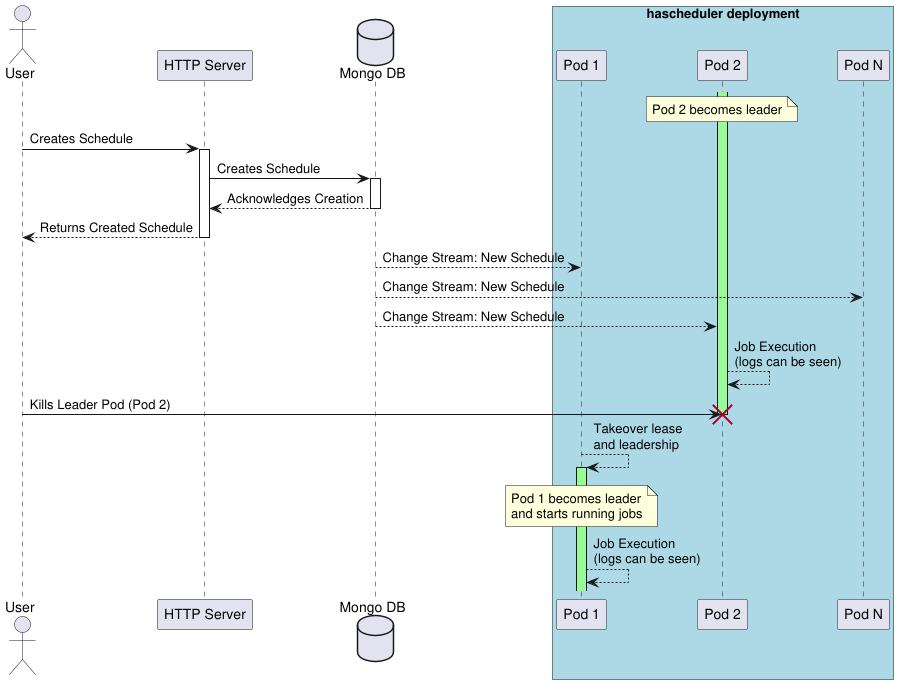
Let’s See This Baby Run: A Quick Demo
So, for this demo, to show you the core idea, we’re gonna keep things simple. Forget about brokers and separate processors for now – we’ll just have our scheduler instances directly running a basic job. Here’s the setup:
Kubernetes in Docker Kind: We’ll spin up a local Kubernetes cluster using Kind to host:
- A MongoDB instance running in a StatefulSet to store our schedules.
- A deployment with 3 replicas of our scheduler. This gives us our redundancy and allows us to see the high availability in action.
Simple Schedules via HTTP: We’ll have a basic HTTP server running alongside our schedulers. Think of it as a simple way to create, update, and delete schedules for testing. In a real-world scenario, you might be doing this through a UI, a CLI, or even triggered by other events – this HTTP server is just for convenience in our demo.
Jobs That Just Log: Our “jobs” in this demo will be very straightforward – they’ll just log a message to the screen when they’re triggered. No need for anything fancy here.
Witnessing the Leader Takeover: The fun part! We’ll identify which of our scheduler pods is the leader (the one holding the lease). Then, we’ll simulate a failure by killing that leader pod. You’ll see one of the other scheduler replicas quickly take over as the new leader, ensuring our schedules keep running without interruption. This is where the “highly available” part really shines!
To illustrate the demo, the following sequence diagram shows the interactions between the user, the http-server and the scheduler instances.
Wanna Play Along? You can find all the code to run this demo yourself over at rbroggi/hascheduler. Go ahead, clone it and give it a spin! You’ll see how easy it is to get this up and running and watch the leader election magic happen.
Peeling Back the Onion: The Tech Under the Hood
So, what are the cool Go tools we’re leveraging here?
Scheduling with gocron: For the actual scheduling part – figuring out when to run those jobs based on cron expressions, intervals, or specific times – we’re using this awesome open-source library called gocron. It’s super flexible and makes defining schedules a breeze.
Leading the Pack with Leaderelection go library: Now for the high-availability magic – the leader election. We’re using our own open-source library called leaderelection. This library is heavily inspired by the leader election implementation in Kubernetes’ go-client. The cool thing about our library is that it lets you choose different places to store the “lease” that the leader holds. Think of the lease as the permission slip to be the active scheduler. Right now, you can choose from:
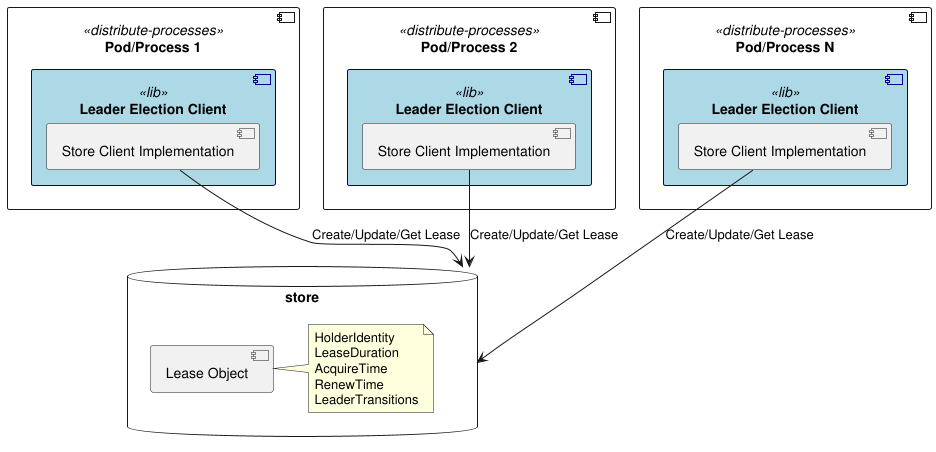
The multiple lease store options offer great adaptability based on your existing infrastructure stack. On top of the mentioned stores you can also roll your own if you have a specific need. All you have to do is to implement the LeaseStore interface:
type LeaseStore interface {
	// GetLease retrieves the current lease. Should return ErrLeaseNotFound if the
	// lease does not exist.
	GetLease(ctx context.Context) (*Lease, error)
	// UpdateLease updates the lease if the lease exists.
	UpdateLease(ctx context.Context, newLease *Lease) error
	// CreateLease creates a new lease if one does not exist.
	CreateLease(ctx context.Context, newLease *Lease) error
}
For those curious about other options, you can see the hascheduler k8s branch where we’ve swapped out the leaderelection lib with the standard Kubernetes leader election implementation.
Now, let’s dig a bit deeper into how this lease-based leader election actually works.
Lease-Based Leader Election: The Lowdown
Now that we’ve got the basic idea of leader election with leases, you might be wondering, “Okay, but how does this actually work in practice?”. Fair question! There are a few key settings that come into play when setting up this kind of leader election: Candidate ID, Lease Duration, and Retry Period. What do these settings mean? Let’s take a quick peek at some of the important ones:
- Candidate ID: This is a unique identifier for the leader candidates. It’s usually something like the hostname of the machine or the pod name in Kubernetes.
- Lease Duration: This is how long the current leader gets to hold the lease before it needs to renew it. Think of it like a timer. If the leader doesn’t renew the lease within this duration, other candidates can try to take over.
- Retry Period: This is how often a candidate (including the current leader trying to renew) will try to acquire or renew the lease.
These settings control how quickly a new leader can take over if the current one fails. Shorter durations mean faster failover, but also more “chattiness” between the scheduler instances and the lease store. You’ll want to tune these based on your specific needs and the reliability of your network and lease store.
It’s helpful to examine the Lease struct as well, which encapsulates the details of the current leader’s hold on power:
type Lease struct {
	HolderIdentity    string
	AcquireTime       time.Time
	RenewTime         time.Time
	LeaseDuration     time.Duration
	LeaderTransitions uint32
}
The remaining fields in the Lease object keep track of when the lease was acquired, renewed, and how many times the leadership has changed hands. Those are mainly book-keeping fields to help with debugging and monitoring as described in the k8s leader election client-go docs:
A client only acts on timestamps captured locally to infer the state of the leader election. The client does not consider timestamps in the leader election record to be accurate because these timestamps may not have been produced by a local clock. The implemention does not depend on their accuracy and only uses their change to indicate that another client has renewed the leader lease. Thus the implementation is tolerant to arbitrary clock skew, but is not tolerant to arbitrary clock skew rate.
A Few Bumps in the Road: Limitations
While lease-based leader election is pretty solid—even Kubernetes uses it for its scheduler—it’s not perfect. Here are some things to keep in mind:
The fencing problem
So, neither our leaderelection library nor the standard Kubernetes one implement out of the box what’s called “fencing”. What this means in practical terms is that there might be very brief moments where two of our scheduler instances could think they are the leader. It’s a bit like a quick hiccup in the system. However, because of the way the lease renewal and retry mechanisms work, this situation should automatically sort itself out within the retry period we talked about earlier. It’s usually a very short window, but it’s something to be aware of.
Clock skew
While both leader election implementations are designed to be reasonably tolerant to minor differences in the clocks of your different scheduler instances (what we call clock skew), they’re not magically immune to consistent differences in how fast time is passing on those machines. If the clocks on your servers are consistently drifting apart at a significant rate, it could still cause some headaches with lease management. So, while they can handle a bit of drift, making sure your servers have decent time synchronization (like through NTP) is still a good practice.
Memory Footprint
Since our scheduler instances keep the schedules in memory for fast lookups, you gotta make sure you provision enough memory for them. If you end up with a gazillion schedules, you could potentially run into memory issues. One way to keep this in check is to avoid storing the entire job definition in the scheduler’s memory. Instead, you can just keep a reference (like an ID) and have your worker processes fetch the actual job parameters when it’s time to run. This way, our scheduler stays lean and mean in terms of memory usage; and if memory is still your bottleneck, partitioning the schedules into multiple haschedulers deployments would be a straightforward solution (though we won’t dive into that here).
That’s a peek under the hood at the main components we’re using to power our highly available scheduler. Pretty cool stuff!
Wrapping up: Time to Schedule All the Things.
So, what have we learned? Well, sometimes, just sometimes, rolling your own solution is not only an exercise in masochism, it can actually be the saner choice.
We saw how we can leverage Mongo to keep all our schedules in check, use its change streams to keep everyone in the loop, and have a bunch of our Go processes duke it out to see who gets to be the leader and actually trigger those jobs. And hey, if the leader decides to take an unscheduled vacation (aka, crashes), no biggie, someone else will step up and take the reins. High availability for the win!
We even did a little demo where we brutally murdered leader pods just to prove our point. If that’s not commitment to reliability, I don’t know what is. And if you’re feeling adventurous, you can even go play with the code yourself – it’s all there on GitHub, ready for your tinkering pleasure.
So, there you have it. You’re now practically a highly available scheduler guru. Go forth and schedule all the things! Just don’t blame me if your newfound power goes to your head and you start scheduling your spouse’s chores… or maybe do, and tell me how it goes. Cheers!
Links and Goodies: Go Explore!
- How Do Change Streams Work In MongoDB?
- Kubernetes Leader Election Client-Go
- How to add Kubernetes-powered leader election to your Go apps
- Leader election best practices
- Change Streams - MongoDB Manual v8.0
- MongoDB Change Streams Overview
- Leader election in distributed systems - AWS
- Adapting K8s leader election to use a different backend